![]()
May 24, 2021
Richard S. Wright Jr.
“One of the keys to facilitating image post processing is to record better data in the first place. I’ve already talked a lot about fundamental techniques to help you capture the best data possible and understand the limits of your equipment or the weather. Once you’ve collected your images though, you need to calibrate them to obtain the best results.
There is nothing wrong with your camera. Proper calibration is always needed for low light images.
Credit: Richard S. Wright Jr.
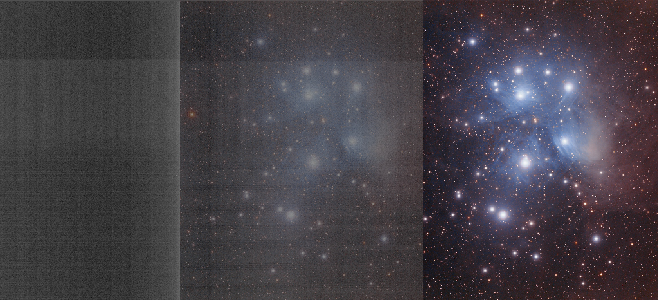
Image calibration is the first step of post processing, and when it’s done right it makes subsequent adjustments easier. Calibration helps remove artifacts that come with the image-acquisition process, so that your post processing deals with the actual good data you have worked so hard to acquire. Image calibration is also called data reduction, because it reduces all that you have collected to just the “data” part.
Many imagers skip calibration completely and some do it improperly. Skipping a step can cost you time and effort later, and doing it improperly can make your initial starting point even worse than not doing it at all. Once images are clean, they require only minimal processing and produce stunning, informative, and honest images.
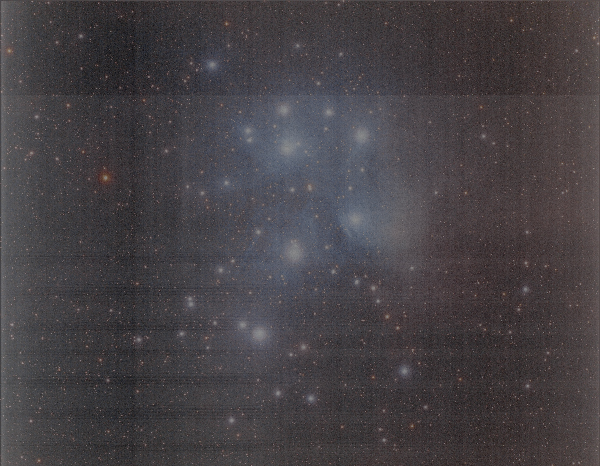
This is simulated, but I’ve seen worse. Faint signal stretched hard will bring out your sensor’s dark fixed-pattern noise. Proper calibration can help a great deal with this. Credit: Richard S. Wright Jr.
To remove the artifacts of the camera and optical system from our data, we use three different kinds of master calibration frames. You’ve probably heard of them: bias, darks, and flats. Flats are important enough to get a blog all their own, so this month I’m going to focus on biases and darks.
Bias Frames
A bias frame is an image taken with no light falling on the image sensor, using the shortest exposure time you can manage with your camera. Either close the shutter or cap your telescope. Bias frames should be recorded at the same temperature as your light frames (the actual exposure of your target), and using all the same camera gain or ISO settings.
If you take your biases during the day, be careful that there are no light leaks getting to your sensor. Filter wheels and focusers often leak ambient light into your camera, which will ruin your bias frames. When I need to record bias frames during the day, I wrap much of the imaging train up with aluminum foil to keep this from happening.
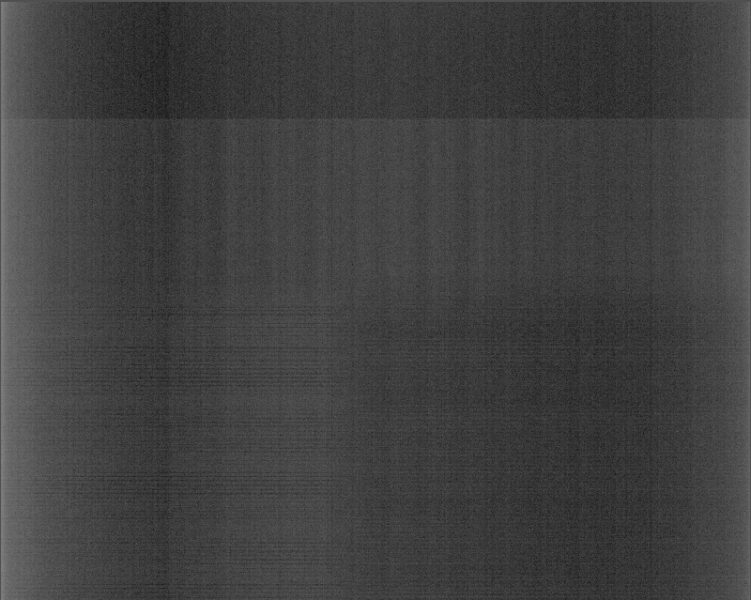
Bias frames capture dark fixed-pattern noise, shown here, from variations in manufacturing that affects all image sensors to some degree. Credit: Richard S. Wright Jr.
Every image sensor, be it a CCD or CMOS, has what is known as dark fixed-pattern noise, a pattern that is the result of the manufacturing process. Every image you take records this faint pattern, no matter how long the exposure was or how much signal falls on your image sensor. The pattern then shows up in your images when you start to stretch (or brighten) the areas of your picture that collected little light.
To remove dark fixed-pattern noise, subtract a bias calibration image from your light image. In order for this step to work well, a master bias frame is created by stacking many individual bias frames, which removes the read noise. You can subtract the master bias frame from any image you take with that camera, with whatever length exposure, as long as the other camera settings (temperature, gain, offset, etc.) are the same.
Dark Frames
A dark frame is like a bias frame in that it’s an image taken with no light falling on the image sensor, but dark frames need to be the same length as your light frames. In other words, if you take several 3-minute exposures on your target, you’ll want to calibrate them using a 3-minute master dark frame, which you’ll subtract from the image. This calibration step removes two things: First, your master dark contains the same dark fixed-pattern noise that your master bias frame does. It also collects dark current, and more pattern noise called DSNU (Dark Signal Non Uniformity). Individual dark frames also contain their associated shot noise with that comes along the dark current.
If you use a master dark frame you don’t need a master bias frame — you really don’t want to subtract the dark fixed-pattern twice!

The left image was recorded without cooling and suffers from excessive noise from the resulting dark current. Credit: Richard S. Wright Jr.
The dark current comes from thermal activity (that is, heat) in the image sensor, and it creates a growing offset to all our pixel values that increases with both time and higher temperatures. If the effect were uniform we might not mind so much, but the offset is spread randomly among the pixels (the DSNU). The dark current also feeds “hot pixels” — pixels that appear much brighter than their neighbors. A good master dark can do a lot to remove that salty appearance from your raw frames. Cooling the sensor also greatly reduces the thermal current that pollutes images.
We can’t simply subtract the shot noise associated with dark current from the dark frame; instead, we have to stack dark frames to minimize the noise. That way, this random noise doesn’t pollute all the light frames that we’re calibrating. The dark current’s shot noise is also in our light frames, but we can only remove this noise by stacking lot of light frames. When we subtract a dark frame, we remove hot pixel offsets and the dark current offset, but we can’t subtract the dark current’s shot noise — stacking is the only way to remove shot noise of any kind.
![]()
Hot pixels can detract from a monochrome or color image. There are many techniques for removing them, but dark frames are a good first defense. Credit: Richard S. Wright Jr.
The Future
So why talk about bias frames if all you really need is a dark frame? Because technological developments may eventually make dark frames obsolete. There are many newer image sensors with extremely low dark current when cooled sufficiently. I really hope this trend continues. Once cooled they may gain a single electron or less per pixel over long periods of time — even 20 minutes in one sensor I’ve tested.
If the camera sensor has no appreciative dark current when cooled, you can apply bias frames to your data and skip doing darks all together. You may still get some hot pixels here and there with these cameras, but those are easily removed with a pixel map in post processing or by dithering your exposures and stacking with a rejection algorithm.
Some CMOS sensors also actively drain off dark current as it accumulates. You can watch this happen by taking longer and longer dark frames and observing that no additional background signal accumulates, even at warm temperatures! Again, in these cases, a good clean bias frame is all you’ll really need, plus stacking plenty of individual exposures.
Stay tuned: Next time I’m going to talk about the alchemy of flat-frame calibration and why often people have such a hard time getting them to work properly for them.”
See the full article here .

five-ways-keep-your-child-safe-school-shootings
Please help promote STEM in your local schools.
![]()
Sky & Telescope, founded in 1941 by Charles A. Federer Jr. and Helen Spence Federer, has the largest, most experienced staff of any astronomy magazine in the world. Its editors are virtually all amateur or professional astronomers, and every one has built a telescope, written a book, done original research, developed a new product, or otherwise distinguished him or herself.
Sky & Telescope magazine, now in its eighth decade, came about because of some happy accidents. Its earliest known ancestor was a four-page bulletin called The Amateur Astronomer, which was begun in 1929 by the Amateur Astronomers Association in New York City. Then, in 1935, the American Museum of Natural History opened its Hayden Planetarium and began to issue a monthly bulletin that became a full-size magazine called The Sky within a year. Under the editorship of Hans Christian Adamson, The Sky featured large illustrations and articles from astronomers all over the globe. It immediately absorbed The Amateur Astronomer.
Despite initial success, by 1939 the planetarium found itself unable to continue financial support of The Sky. Charles A. Federer, who would become the dominant force behind Sky & Telescope, was then working as a lecturer at the planetarium. He was asked to take over publishing The Sky. Federer agreed and started an independent publishing corporation in New York.
“Our first issue came out in January 1940,” he noted. “We dropped from 32 to 24 pages, used cheaper quality paper…but editorially we further defined the departments and tried to squeeze as much information as possible between the covers.” Federer was The Sky’s editor, and his wife, Helen, served as managing editor. In that January 1940 issue, they stated their goal: “We shall try to make the magazine meet the needs of amateur astronomy, so that amateur astronomers will come to regard it as essential to their pursuit, and professionals to consider it a worthwhile medium in which to bring their work before the public.”
